

Section two is a little bit all over the shop. In 2.1.2 you are expected to be able to demonstrate the skill of creating and writing algorithms in three ways – one of which is in a programming language. In this section we will focus on mainly the skill of creating a flow chart. Pseudo code or the “OCR Reference Language” as it is now known, is basically programming and so we’ll cover that in section 2.2 so it’s all neatly placed together.
In this section:
- Identifying inputs, processes and outputs
- Making flow charts
- Identifying common errors in programs
- Producing Trace Tables
Identifying inputs, processes and outputs
A computer is a device which takes input, processes it in order to provide useful output. It is no surprise to discover that if we are to make computer programs then we must identify these key parts of any program to be made as part of the design process.
Input
Input is data going IN to a machine. In a program, it is data which is typed in or read from a file and stored in a variable.
Inputs can take many forms, such as data coming from a sensor reading the temperature of a room. However, at GCSE we keep things very simple and an input will only ever be one of two things:
- Some text or numbers typed in by a user on a keyboard.
- Some data read from a file.
Inputs can be easily identified when we are trying to solve a problem or create an algorithm. All you have to do is ask yourself:
“Where does a user need to type something or where do I need to read data from a file?” Those are your inputs!
This is much easier to understand with an example from the 2023 Unit 2 exam paper:
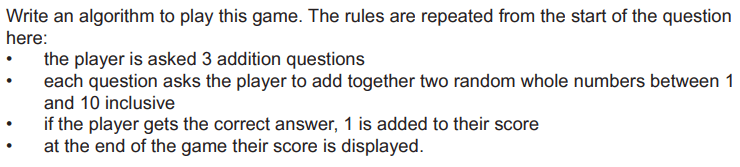
All questions in the exam are neatly laid out like this.
Looking at this question, all you need to do is look at the list of bullet points and ask yourself “is there any need for a user to type something in or to read data from a file?”
I would hope that it is quite obvious in this example that the only input will be when the user types in their answer to each question. That’s it!
There is a golden rule with inputs and that is all input must be stored in a variable. Whether you are creating a flow chart, pseudo code or creating real code – this rule applies. You must store input in a variable.
In the “OCR Reference Langauge” that would look something like this:
answer = input("Please type in your answer: ")
//asks the user to type in an answer, stores it in the variable called "Answer"

tempData = dataFile.readline()
//gets a line of data from a file called "dataFile" and stores it in "tempData"
Processes

Processes are things the program must do in order to produce the desired result. In other words, these are the logical steps that are taken to solve a problem. If that sounds a lot like an algorithm to you, then it should… because it is.
A process could be any of the following:
- Applying mathematical operators – +, -, *, / etc
- Manipulating data – such as adding an element to an array
- Making decisions – using IF statements
- Iteration – repeatedly performing a task in a loop
These are the basic building blocks of all programs and we will cover them in far more detail as we make actual programs and learn to solve problems using the OCR Reference Language.
For clarity, using the previous example, what processes need to take place to solve this problem?
The processes for this problem would be bullet points 2-4 and roughly would equate to the following:
- generate a random number, store it in a variable
- Loop three times, asking the user questions, displaying the random numbers
- Store the user answer in a variable
- check the answer is correct, increment score as necessary
- After the loop, display the score
This will become far clearer as we complete the programming section of this unit.
Outputs
Outputs are any information or data which comes OUT of a computer system. In our GCSE, that means output is anything written on the screen by a program or saved into to a file.
In the example exam question above, the output would be “at the end of the game their score is displayed.” The code for this would look something like:
Print("Your final score is " + score)
//outputs the score to the player.
There’s no need to over complicate things – that really is it for output!
Making flow charts
Flow charts are one method we can use to visually represent the steps of an algorithm. Flow charts are useful because they allow you to quite literally “follow the flow” of a program by reading the contents of each symbol and following a line.
When we use the term “flow” in programming, we are referring to the order in which program statements or instructions will be carried out. This is also known as “sequence” or “sequencing.”
Very, very simple programs may have a flow which is entirely linear – it starts with line 1 and works through until the end. Most programs are not linear and will jump over certain blocks of code based on a rule, or will go round in circles repeating an action in a loop. In these cases, the flow of the program differs based on the programming technique (construct) being used.
Print("please type in your name")
name = Input()
Print("Hello, " + name + " nice to meet you.")

//a program with linear flow. It starts at the top, works its way to the bottom. No jumps, no loops.


For I=1 to 12
    Print("I like HobNobs, they are king of all biscuits")
Next I

//a program with non-linear flow, it returns back to the start 12 times based on a rule (the loop counter)
“What was that?”
“That was your life, mate!”
“Do I get another one?”
“Nah, sorry.”
The flow of life, ladies and gentlemen.
Flow chart symbols and rules
There are only really five symbols you need to learn in order to draw a flow chart for any given problem.
| Symbol name | Symbol and Example | Purpose |
| Start / Stop |  | Shows the start and end of the flow chart |
| Process |  | Used for any logical, mathematical steps the program will take |
| Input / Output | 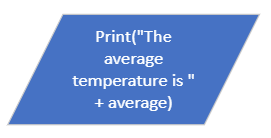 | For input in to the program, output to the user |
| Decision |  | For making a “yes or no” type decision |
| Sub Routine | 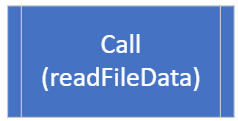 | To break the diagram into chunks for more complex problems. Sub routines have their own “start/stop” block and are “called” using this symbol. |
The rules of flow charts are very simple, but you must stick to them rigidly. These rules are:
- There must be one start and one stop symbol
- All boxes/symbols must be linked by a line/arrow
- Decision symbols must have two lines coming out – a yes and a no.
That’s it!
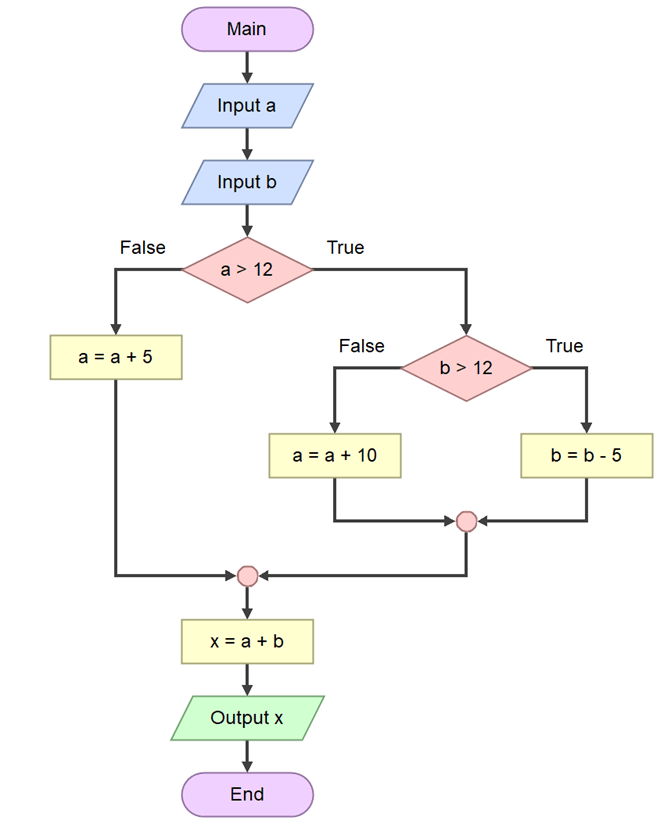
Drawing a Flowchart – An Example Question
Let’s draw a flow chart for the exam question given earlier – you can obviously pause at this point and try this yourself if you want. Here’s the question again:
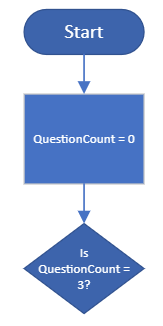
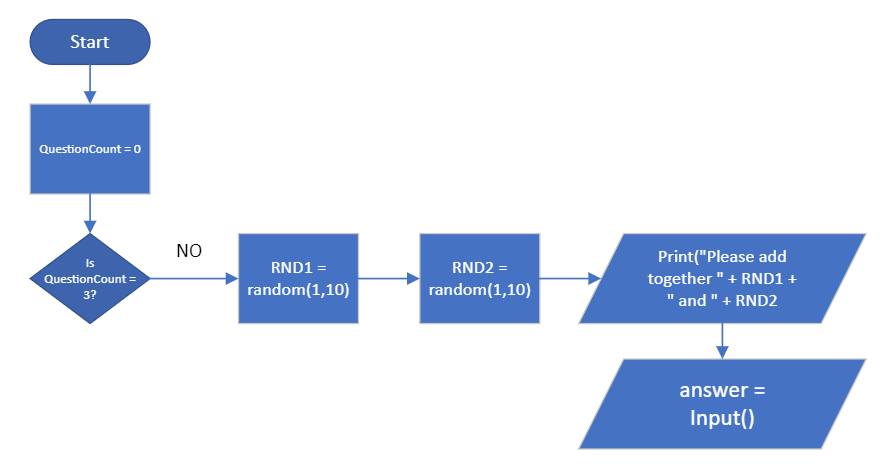
To make a flow chart for this question, we can just work through the bullet points one by one, starting with the golden rules – it must have a start symbol.

The first bullet point tells us that the same thing has to happen three times and straight away we hit one of the downsides of flowcharts – it doesn’t have a loop symbol we can conveniently use. Instead, we’ll bodge it by using decision blocks.
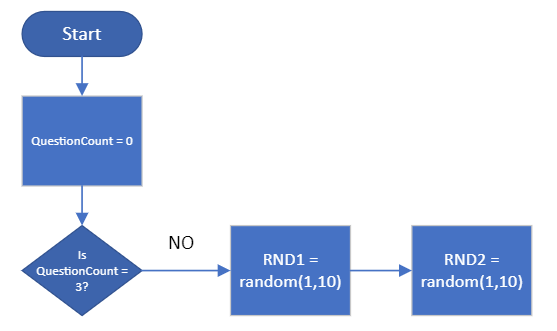
Next, we need to generate two random numbers between 1 and 10. This is a process.
Next, we ask the user to add those numbers together and store the result, these are input/output operations:
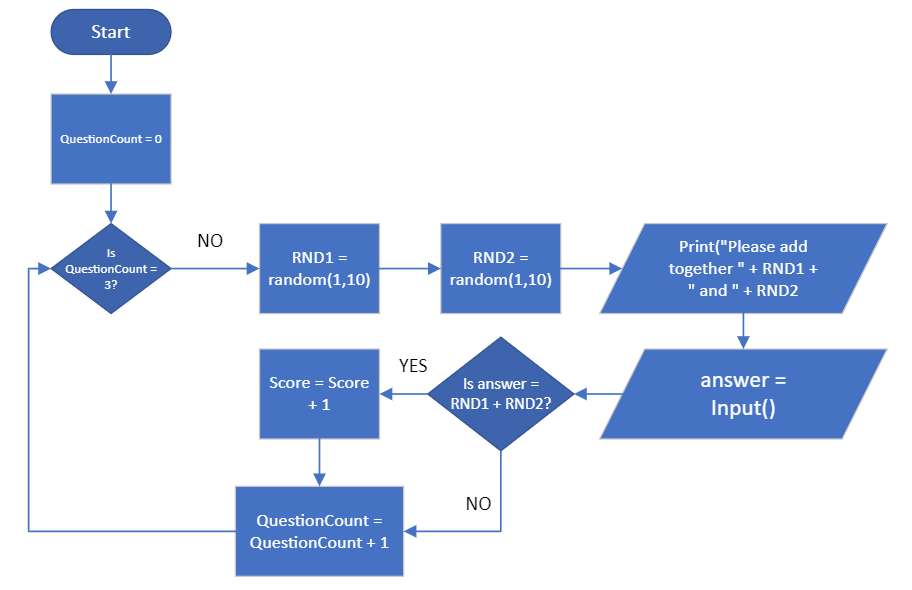
Check if the answer is correct and add one to the score if so. This is a decision followed by a process.
Finally, output the score at the end of the game:
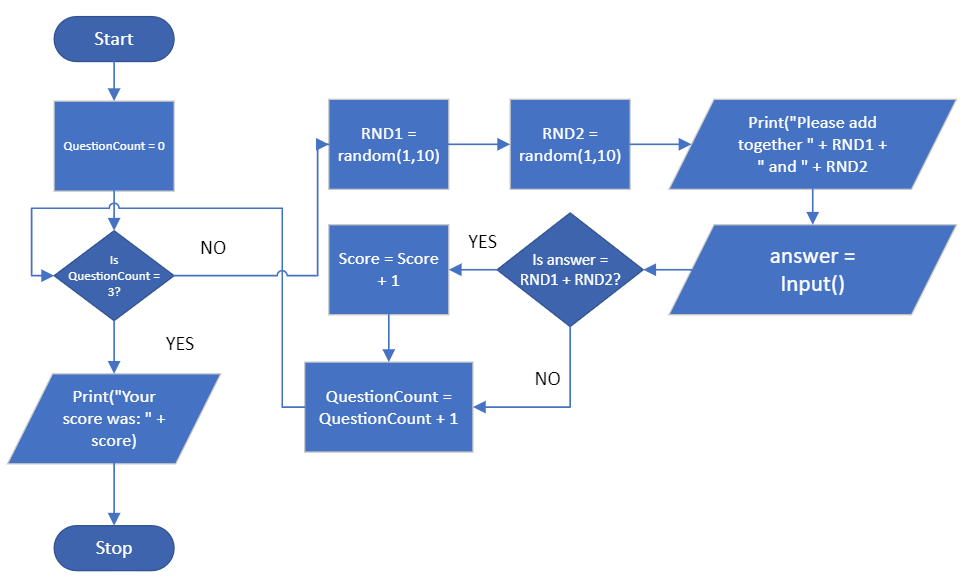
Whilst constructing a flow chart is not difficult if you break it down into stages, you can probably see that they quickly become quite large and cumbersome. Don’t worry, for you in the exam this is a good thing as you will only ever get questions with quite simple flow charts to avoid this very problem!
Identifying common errors in programs
Programs never, ever work as you intended them to the first time they are run. Errors and mistakes are inevitable.
The majority of time spent creating a program is usually dedicated to the finding and eliminating of errors. Often, you’ll create a program that’s coded in the way you think it should work and then upon running it you’ll quickly discover that the computer, and indeed logic, have other ideas.
There are two common types of errors found in programs:
- Syntax errors
- Logic errors
Syntax errors
Syntax errors are:
- A mistake in the code which breaks the rules or grammar of a language.
- Errors which will stop the program from being compiled – you cannot run a program with syntax errors until they are fixed.
The simplest example of a syntax error is a spelling mistake. Syntax errors will also occur if the rules of the language are not followed – for example missing a symbol or swapping the order of command words.
Prnit("Samosas for breakfast") //syntax error - spelling!

Print("Samosas for breakfast") //syntax ok

THEN a == b IF //syntax error - incorrect order.

IF a == b THEN //syntax ok
Most modern IDE’s will warn you of syntax errors as you type in code and can be corrected as you go. Remember, a program cannot be run at all if it contains syntax errors as the compiler will return an error.
Logic errors
Logic errors are far more annoying than syntax errors because a program which contains a logic error will run. You may think you’ve solved a problem, breathed a sigh of relief when the compiler happily produces your program executable, but then under testing it starts behaving strangely.
Logic errors are:
- Errors which do not stop the program from running…
- …and cause unexpected or unpredictable program behaviour and outputs.
To fix a logic error usually requires the use of some fairly systematic testing. Methods that can be used to find a logic error are:
- Trace tables
- Break points
- Program stepping (executing line by line)
- Variable watches (monitoring what is in a variable at a given point)
- Manually reviewing the code / dry running the program
These features are built in to most modern IDE’s. Some examples of logic errors are below:
If A = B then //Logic error, should be A == B

If A > B then //potential logic error - did you mean < not > ?

B = A //potential logic error - did you mean B = C?
Producing Trace Tables
Trace tables are one specific method of testing that OCR decided to leave in this section, rather than the section on… testing and making robust programs, because OCR.
Regardless, sometimes there are logic errors in your programs and you can’t for the life of you figure out where it is or why it isn’t working in the way you expected. One method you can use to test an algorithm and spot errors is by using a trace table.
A trace table is nothing more than a table containing the variables in your program. You then run through the program, line by line, on paper. As you go along, you “dry run” the program and work out what the value of variables are – writing them down as they change.
This sounds complex, but it really isn’t. As usual, an example really helps us here.
Here’s a question from the June 2022 Unit 2 paper:
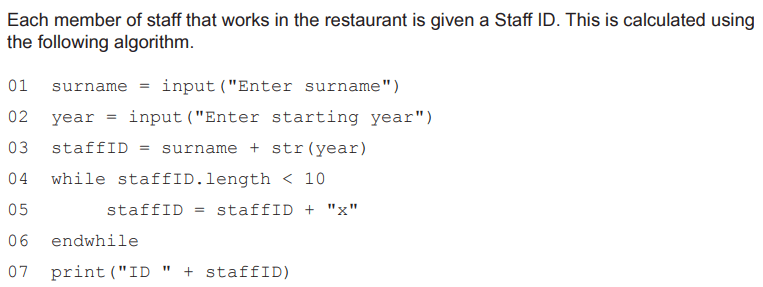
This is an extremely simple bit of code. You need to understand concatenation (bolting bits of text together) and how a loop works and you’re pretty much sorted.
If you’re struggling to understand, here’s what it does:
Line 1 : Takes in the users surname, stores it in a variable called surname
Line 2: Takes in the year they started their job and stores it in a variable called year
Line 3: Creates their username. It does this by joining together whatever their surname is with the year they typed on. For example, if they typed in “Reeves” and “2018” then it would produce “Reeves2018” It then stores this username in a variable called staffID
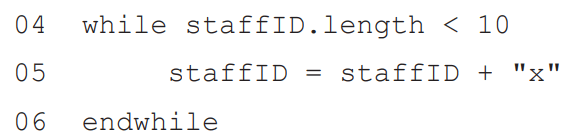
Line 4: Starts a loop based on whether the variable staffID has less than 10 letters in it. If it is over 10 letters then the program will skip forward to line 7. If it has fewer than 10 then it will do line 5 until the staffID is 10 letters long.
Line 5: Simply takes the staffID variable and puts the letter “x” on the end of it.
Line 6: Goes back to Line 4 to check if the staffID is now the correct length
Line 7: Prints out the staffID variable and some text – for example “ID Reeves2018”
Now we’re clear on how the code works, let’s look at that trace table question:

In the exam, you’re given a table to fill in. If you’re practising, or just in a lesson, then you can make your own table by putting the variable names along the top, with any outputs and the line numbers down the side like this:
| Line Number | Variable: Surname | Variable: Year | Variable: staffID | Output |
| 01 | Kofi | |||
| 02 | 2021 | |||
In the example above you can see the first two rows have been filled in. All you have to do is run through the program one line at a time and work out what is happening. Then, if any variables change, simply write a new row in the table and put down what the variable has changed to. That’s it.
Let’s see what happens for line 3 :

| Line Number | Variable: Surname | Variable: Year | Variable: staffID | Output |
| 01 | Kofi | | | |
| 02 | | 2021 | | |
| 03 | | | Kofi2021 | |
| | | | | |
| | | | | |
As you can see, line 3 does not change surname or year, so we leave those blank. It does change the staffID variable so we work out what that is and write it in the table as shown.
Now, for the loop:
| Line Number | Variable: Surname | Variable: Year | Variable: staffID | Output |
| 01 | Kofi | | | |
| 02 | | 2021 | | |
| 03 | | | Kofi2021 | |
| 05 | | | Kofi2021x | |
| 05 | | | Kofi2021xx | |
You can see that line 5 has two entries in the table. This is because it was executed repeatedly in the loop – the user name went from 8 characters, to 9 and then 10 before the loop stopped.
There is one final line to the program, and therefore our trace table:

| Line Number | Variable: Surname | Variable: Year | Variable: staffID | Output |
| 01 | Kofi | | | |
| 02 | | 2021 | | |
| 03 | | | Kofi2021 | |
| 05 | | | Kofi2021x | |
| 05 | | | Kofi2021xx | |
| 07 | ID Kofi2021xx |
Don’t forget, when showing outputs you must pay careful attention to the whole line of code. If there is any text in quotes, this is part of the output so you should write that down as well – hence the “ID” text is included in the output above.
That’s all there is to it!